I was recently helping a friend get set up running OpenGL and I realized that most of the instructions available online for this are fairly outdated. So, here’s a quick run through to set the record straight. This guide is meant for beginners who just want to get a simple OpenGL desktop app going on a Windows machine.
This guide assume you have the following installed:
- Windows 7 or newer
- Visual Studio 2008 or newer
By convention, we assume the OS is installed to the C drive and VS is installed to a folder such as C:\Program Files (x86)\Microsoft Visual Studio 10.0. VS 2008 maps to 9.0, VS 2010 to 10.0, and VS 2012 to 11.0.
Installing GLUT
The first step is to download GLUT (the OpenGl Utility Toolkit). This library provides a slew of helper functions for working with OpenGL, including setting up a window. Grab the latest binaries from here. Unzip this and copy the binaries out into the following directories. Be aware that these are 32-bit binaries. You will need to create the gl folder in Microsoft Visual Studio 10.0\VC\include\, as it doesn’t already exist.
| File | Destination Folder | |
|---|---|---|
| Windows 64-bit | glut32.dll | C:\Windows\SysWOW64\ |
| glut.h | C:\Program Files (x86)\Microsoft Visual Studio 10.0\VC\include\gl\ | |
| glut32.lib | C:\Program Files (x86)\Microsoft Visual Studio 10.0\VC\lib\ | |
| Windows 34-bit | glut32.dll | C:\Windows\System32\ |
| glut.h | C:\Program Files\Microsoft Visual Studio 10.0\VC\include\gl\ | |
| glut32.lib | C:\Program Files\Microsoft Visual Studio 10.0\VC\lib\ |
Creating the VS project
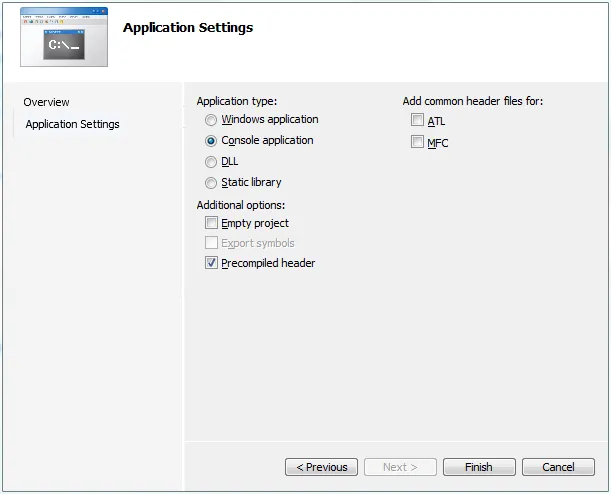
Now boot up Visual Studio. You’ll want to create a simple Win32 console application. In VS 2010, open the New Project dialog and look at the list of templates. Select “Visual C++\Win32\Win32 Console Application”. Click through the Wizard that appears, leaving the defaults in place.
Linking the libraries
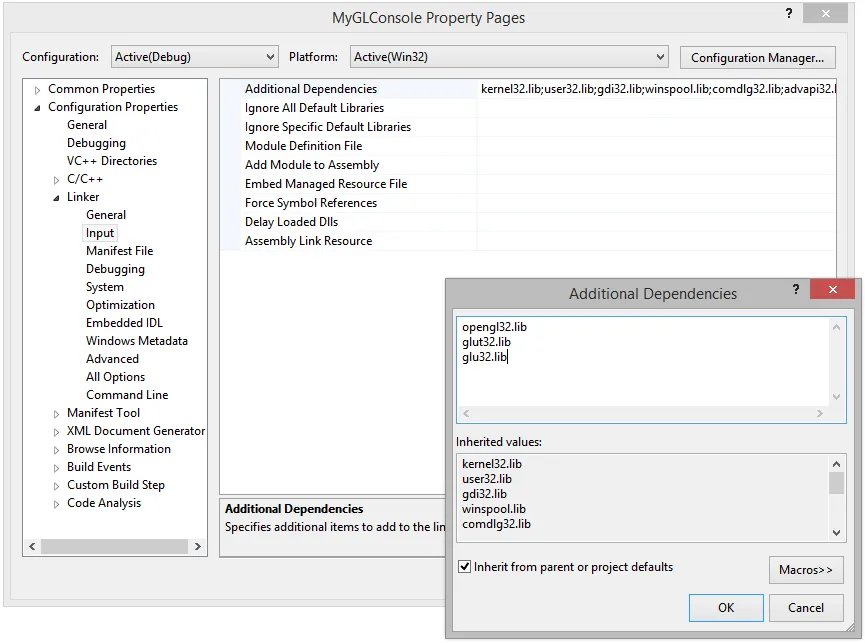
At this point you should get a solution with a couple of default files and a _tmain entry function. Right-click the project you created, go to Properties, then open Configuration Properties\Linker\Input and add the following to the “Additional Dependencies” field: opengl32.lib;glut32.lib;glu32.lib.
Writing the code
Modify your main .cpp file to look like this:
#include "stdafx.h"
#include <gl/glut.h>

// One-time initializtion logic
void init( void )
{
    printf( "OpenGL version: %s\n", (char*)glGetString(GL_VERSION));
    printf( "OpenGL renderer: %s\n", (char*)glGetString(GL_RENDERER));

    //Configure basic OpenGL settings
    glClearColor(0.0, 0.0, 0.0, 1.0);
    glShadeModel(GL_SMOOTH);
    glEnable(GL_BLEND);
    glEnable(GL_TEXTURE_2D);
}

// Main drawing routine. Called repeatedly by GLUT's main loop
void display( void )
{
    //Clear the screen and set our initial view matrix
    glClear(GL_COLOR_BUFFER_BIT | GL_DEPTH_BUFFER_BIT | GL_STENCIL_BUFFER_BIT);
    glMatrixMode(GL_MODELVIEW);
    glLoadIdentity();

    //TODO: Perform drawing here

    //We just drew to the back buffer. Now we need to swap that with the
    //front buffer to show it on screen.
    glutSwapBuffers();
}

// Entry point - GLUT setup and initialization
int main( int argc, char** argv )
{

   glutInit( &argc, argv );
   glutInitDisplayMode (GLUT_DEPTH | GLUT_DOUBLE | GLUT_RGB);
   glutInitWindowSize (800, 600);
   glutInitWindowPosition (100, 100);
   glutCreateWindow( "OpenGL Test" );
   glutDisplayFunc( display );

   init();

   glutMainLoop();

   return 0;
}
Hit F5 to build and run. You should get a window with a black screen. Pat yourself on the back. You’re now ready to start coding with OpenGL.